前言
为什么要使用这个功能呢,可能大家看到这标题有点绕,先说说我个人想要实现的功能吧,我Openwrt磁盘不大,我又在别一台window10上共享了一个E盘,有1T,理应在我的客户端再添加一个共享就可以了,但为了便于一台设备管理,我就把win10的盘挂载到openwrt,再统一用openwrt的网络共享。这样就只要一个共享盘就能管理所有网络共享文件了。
实现
第一步,挂载其它共享到openwrt
如果固件没问题的话,且自带有"挂载 SMB/CIFS 网络共享文件夹"插件的话,其实很简单的,如果没有,也只要安装一下cifs opkg update
opkg install luci-app-cifs

网络存储——挂载SMB网络共享,如图
服务器IP:填写win10的内网IP地址
共享文件夹:填写共享的目录
挂载路径:这个要设一下,后面会用到
设置完成要重启cifs服务,或者直接重启openwrt。
在这一步的时候,我遇到了问题,就是前面说的固件没问题话就成功了。
- 家里的Openwrt直接开启,能自动挂载上
- 公办室的Openwrt遇到的问题是挂载点不会自动挂载上
解决办法
vi /etc/init.d/cifs
找到mount,在前面加上busybox #echo "mount -t cifs -o vers=$smbver,user=$users,password=$pwd,iocharset=$iocharset,$agm //$server/$name $natpath"
mount -t cifs -o vers=$smbver,user=$users,password=$pwd,iocharset=$iocharset,$agm //$server/$name $natpath
##修改成
#echo "busybox mount -t cifs -o vers=$smbver,user=$users,password=$pwd,iocharset=$iocharset,$agm //$server/$name $natpath"
busybox mount -t cifs -o vers=$smbver,user=$users,password=$pwd,iocharset=$iocharset,$agm //$server/$name $natpath
保存,重启cifs
参考文章:https://github.com/stupidloud/nanopi-openwrt/issues/988
第二步,检测挂载是否成功

可以看到已经成功了
第三步,网络共享
把挂载了/mnt/testshare共享出去

起个易识别的名,比如我起pc22
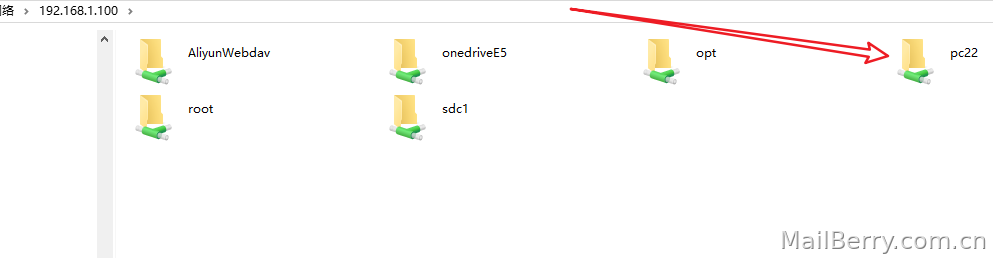
这样我就能在一个入口管理所有共享的目录了。
总结
以后可以把Openwrt当做一个公共入口,可以挂载小雅Alist、Rclone、家里的公共资源、办公室的共享资源。一句话,一个入口统管所有有共享资源。下次写文介绍利用openwrt挂载alist当共享磁盘。


暂无评论