前言
之前浅尝了一下Midjourney《小白初体验Midjourney AI绘画神器过程(教程)》功能和ChatGPT一样,惊艳到我了,2023年,真是一个改变互联网元年呀。互见进入WEB3.0不再是天方夜谭了。扯远了,主要是Midjourney不再提供免费试用,就想着找一下替代方案,也是今天的主角——Stable Diffusion
准备
- git
- python 3.10.6版本
- model
- stable Diffusion
过程
第一步,安装Git
Git官网:Git
第二步,安装python ,这里按项目方的要求安装3.10.6版本,复制路径,后面会用到
官方下载地址:https://www.python.org/downloads/release/python-3106/
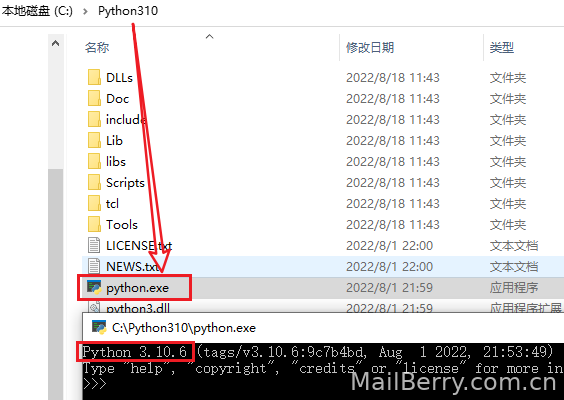
比如我的安装在C:\Python310
第三步,下载主角——Stable Diffusion
官方项目:https://github.com/AUTOMATIC1111/stable-diffusion-webui
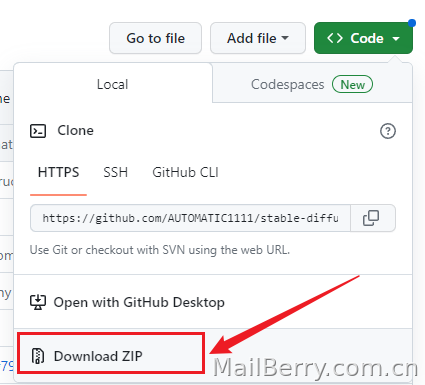
如果你第一步安装了git,可以用上面的git地址,直接克隆,我在D:\AI目录下git clone
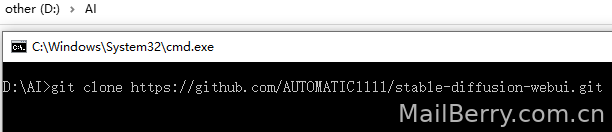
CMD到D:\AI目录,或者在资源管理器那进到这个目录,在地址栏输入CMD,也能来到如上位置
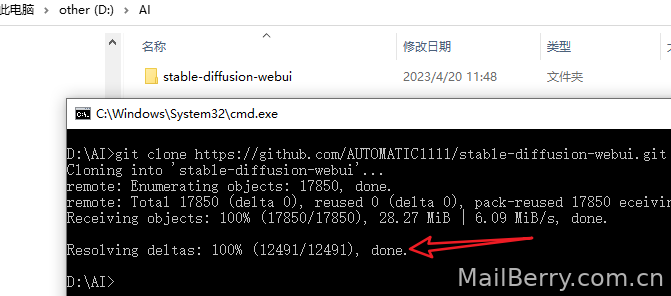
git clone https://github.com/AUTOMATIC1111/stable-diffusion-webui.git
100% done,表示项目已克隆成功。
至此:我已得到项目文件目录,在D:\AI
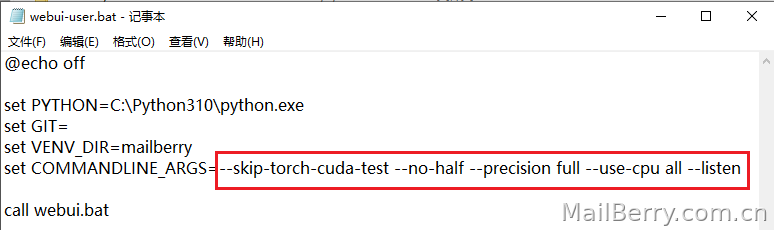
第四步,配置项目参数
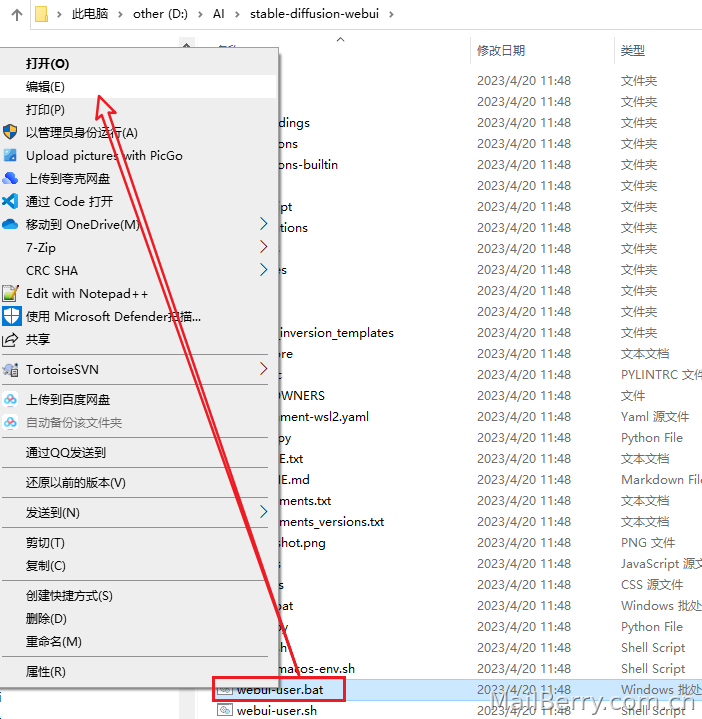
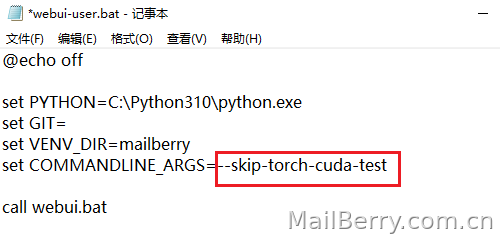
在目录找到webui-user.bat批处理文件,右键——编辑
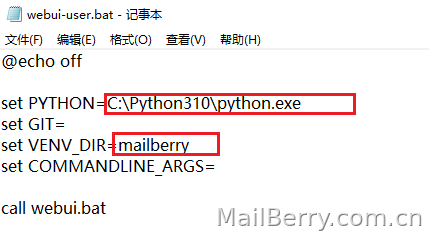
set PYTHON添加第二步里安装python时候的路径,
set VENV_DIR自定义名称,随便
保存
第五步,运行webui-user.bat 下载相关文件

错误一:
WARNING:Retrying (Retry(total=4,connect=None,read=None,redirect=None, status=None))after connection broken by New onnectionError('<pip._vendor.ur1lib3.connection.HTTPSConnection object at 0x000002C59D65B8E0>:Failed to establish a nev connection:[WinError 10061]由于目标计算机积极拒绝,无法连接。'):/simp1e/torch, ERROR:Operation cancelled by user
如果出现这个提示,那是你的互联网络没有实现真正的“互联”,解决能上谷歌的网络环境就能解决了。
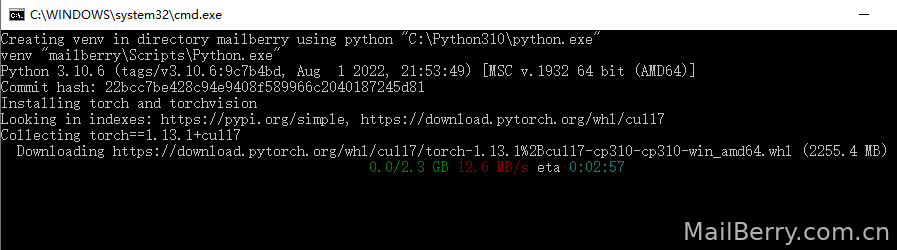
下载中。。
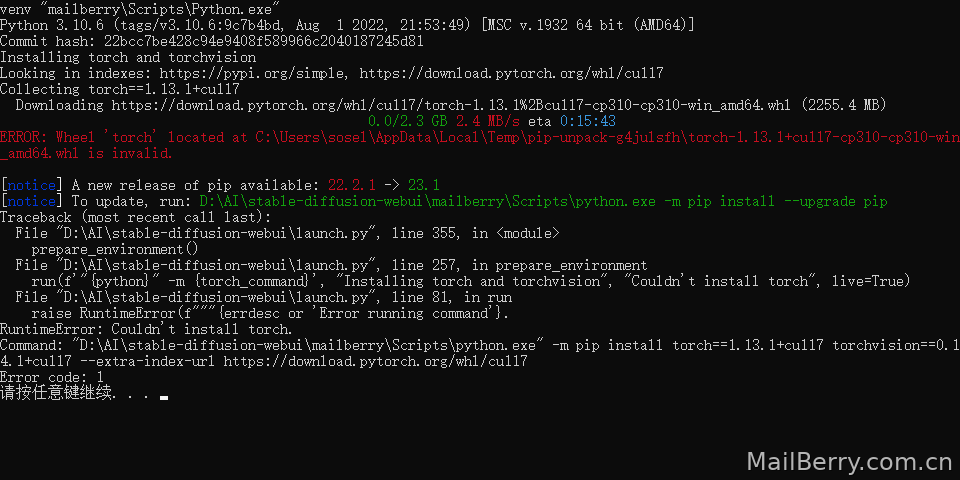
错误二:
ERROR:Whee1'torch'located at C:\Users\sosel\AppData Local\Temp\pip-unpack-g4julsfh\torch-1.13.1+cul17-cp310-cp310-wir amd64.whl is invalid.
按提示升级PIP到23.1版本
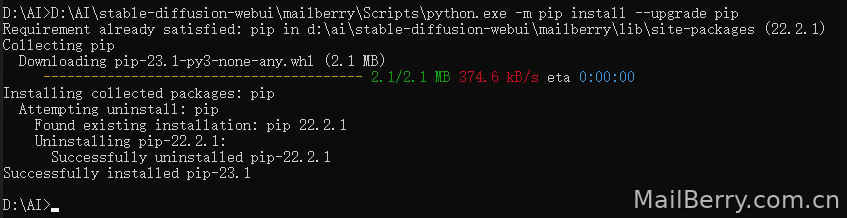
再次运行webui-user.bat
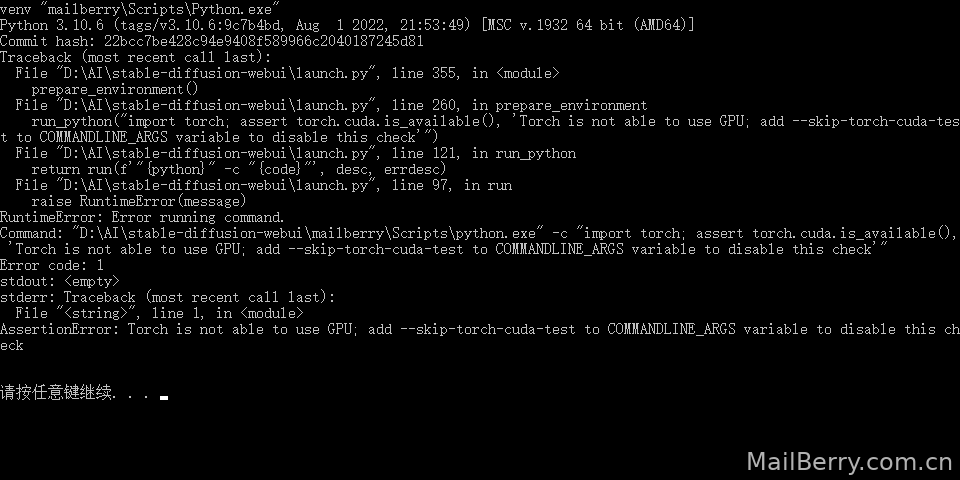
错误三:
AssertionError:Torch is not able to use GPU;add --skip-torch-cuda-test to CoMMANDLINE ARGS variable to disable this ch eck
这个错误是我的电脑没有GPU,使用需要添加跳过参数--skip-torch-cuda-test
回到第四步的:添加跳过GPU参数
再运行
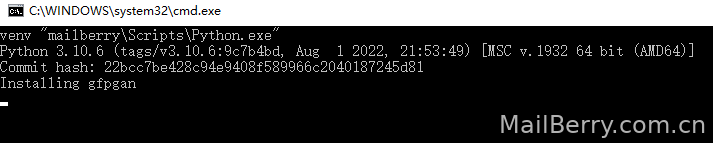
正在安装。。。
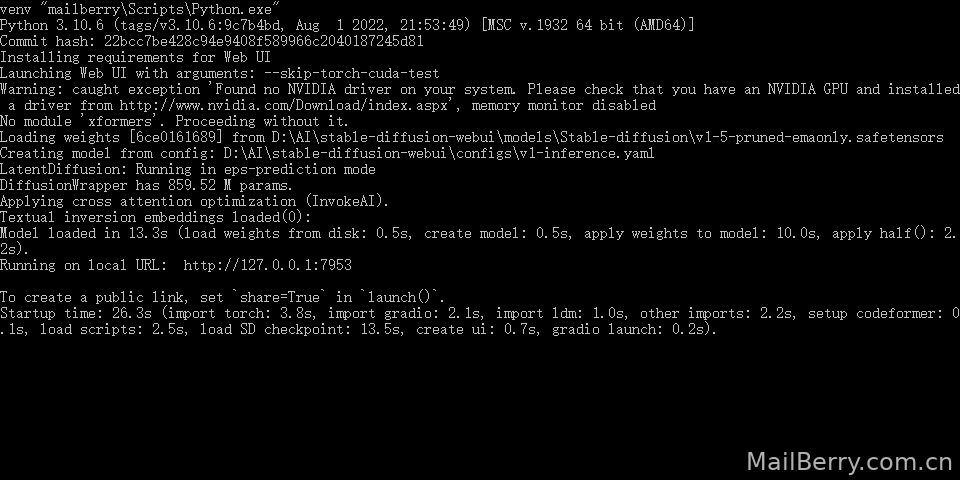
完成安装,看到Running on local URL:http://127.0.0.1:7953 ,说明成功了。
第六步,下载模型
stable-diffusion-v1.5:https://huggingface.co/runwayml/stable-diffusion-v1-5
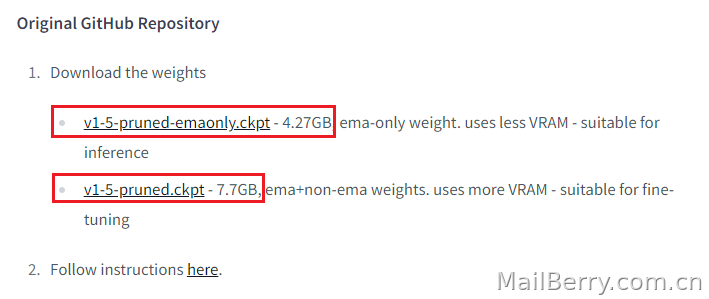
一个只有ema,轻量,推荐,默认会下载,不需要下。
一个ema+非ema,适合微调,有点大。
默认安装完,会自己下载v1-5-pruned-emaonly.safetensors ,也就是上面的第一个
如果你要下载微调的可下载第二个7.7GB的版本,可自行下载,放到你的项目位置
如我的:
D:\AI\stable-diffusion-webui\models\Stable-diffusion
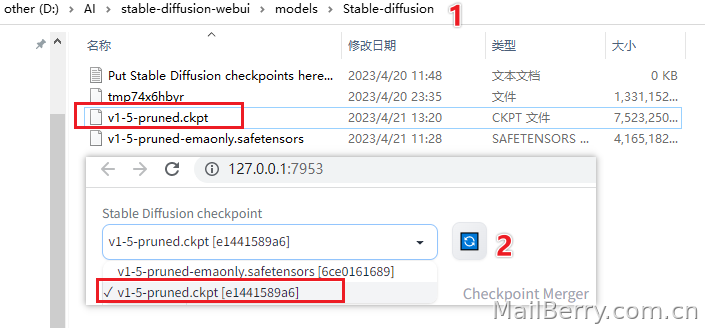
1,先把下载的Model复制到这个目录
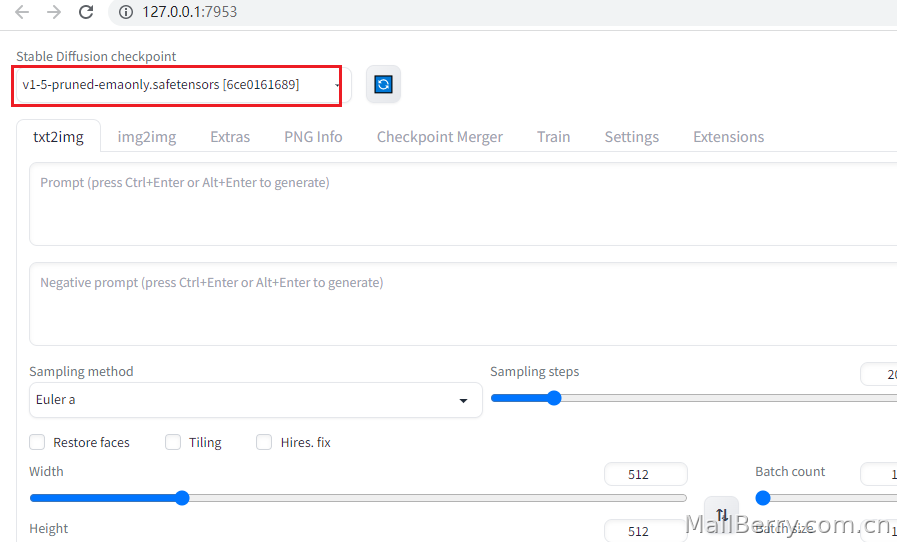
2,再在127.0.0.1:7953更新一下,就能选择模型了
体验
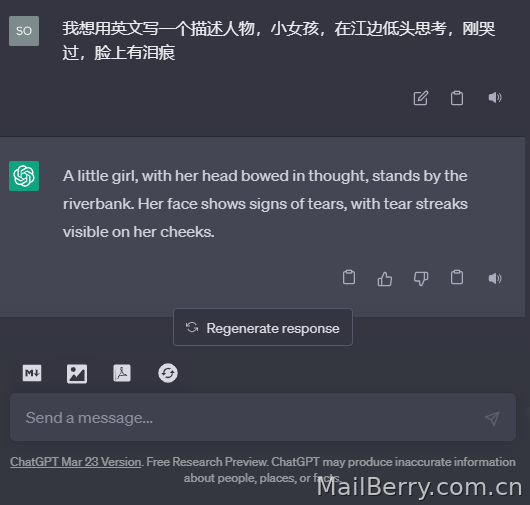
先用ChatGPT中文写Propmt,转成英文,非常适合我这种英文不好的人,囧
错误四:
RuntimeError: "LayerNormKernelImpl" not implemented for 'Half'
这个错误是因为在运行代码时使用了 PyTorch 中不支持 'Half' 数据类型的操作,'Half' 是半精度浮点类型。这可能是因为您的模型或代码中的某些操作需要使用更高的精度。
为了解决此错误,您可以尝试将操作转换为其他 PyTorch 支持的数据类型(如 'Float' 或 'Double')。如果您使用的是预训练模型,则可能需要查看模型文档以确定支持的数据类型。可以尝试将模型或代码运行在支持 'Half' 数据类型的计算设备上,如 NVIDIA 的 Tensor Cores。
https://github.com/facebookresearch/fairseq/issues/2413 解决方案
折腾半天,电脑没显卡,还玩不了
CPU运行
都折腾到这么多了,总不能因为没有GPU去买显卡吧,最终还是找到了办法,强制使用CPU运算,尽管很慢慢慢,但总算是体验到了
方法
还是在前面的一个完整的跳过命令
--skip-torch-cuda-test --no-half --precision full --use-cpu all --listen
这样就是强制使用CPU来运算了,就是你电脑没有显示GPU运算能力,一样能使用stable diffusion的
效果
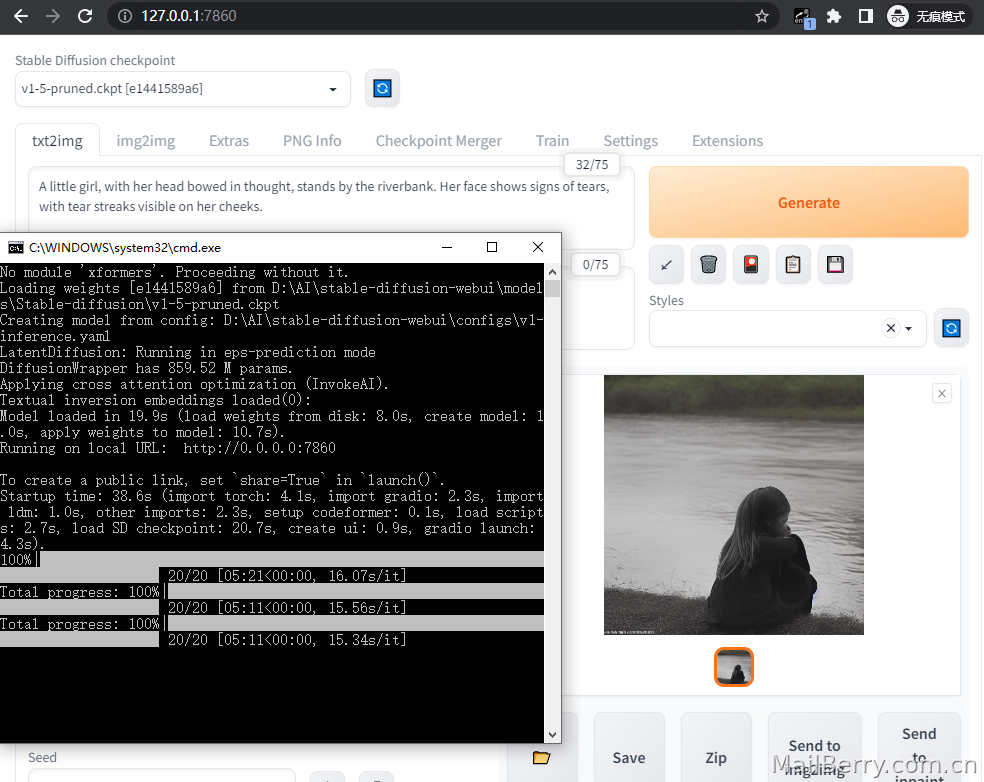
花了5分钟,有点慢,哈哈,但聊胜于无。
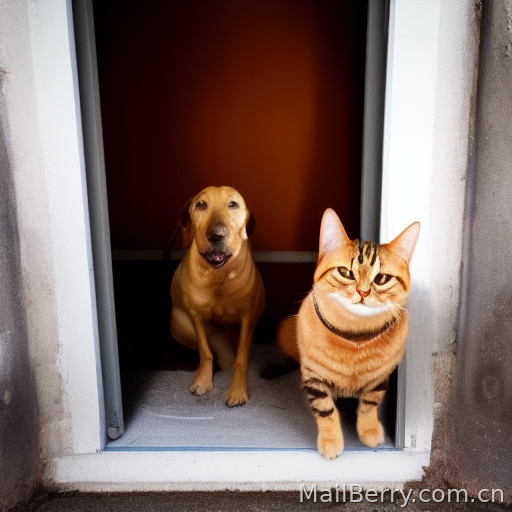
示例一,用我二级半的英文,哈哈
a dog and a cat in the door behind
更多模型
Stable Diffusion WebUI 运行时会自动下载 Stable Diffusion v1.5 模型. 下面提供了一些快速下载其它模型的命令.
$ cd models/Stable-diffusion
# F222
$ wget https://huggingface.co/acheong08/f222/resolve/main/f222.ckpt
# Anything V3
$ wget https://huggingface.co/Linaqruf/anything-v3.0/resolve/main/anything-v3-fp16-pruned.safetensors
# Open Journey
$ wget https://huggingface.co/prompthero/openjourney/resolve/main/mdjrny-v4.ckpt
# DreamShaper
$ wget https://civitai.com/api/download/models/5636 -O dreamshaper_331BakedVae.safetensors
# ChilloutMix
$ wget https://civitai.com/api/download/models/11745 -O chilloutmix_NiPrunedFp32Fix.safetensors
# Robo Diffusion
$ wget https://huggingface.co/nousr/robo-diffusion/resolve/main/models/robo-diffusion-v1.ckpt
# Mo-di-diffusion
$ wget https://huggingface.co/nitrosocke/mo-di-diffusion/resolve/main/moDi-v1-pruned.ckpt
# Inkpunk Diffusion
$ wget https://huggingface.co/Envvi/Inkpunk-Diffusion/resolve/main/Inkpunk-Diffusion-v2.ckpt
更多模型和图片的Propmt,可以到这个网站参考一下大神们的提示语
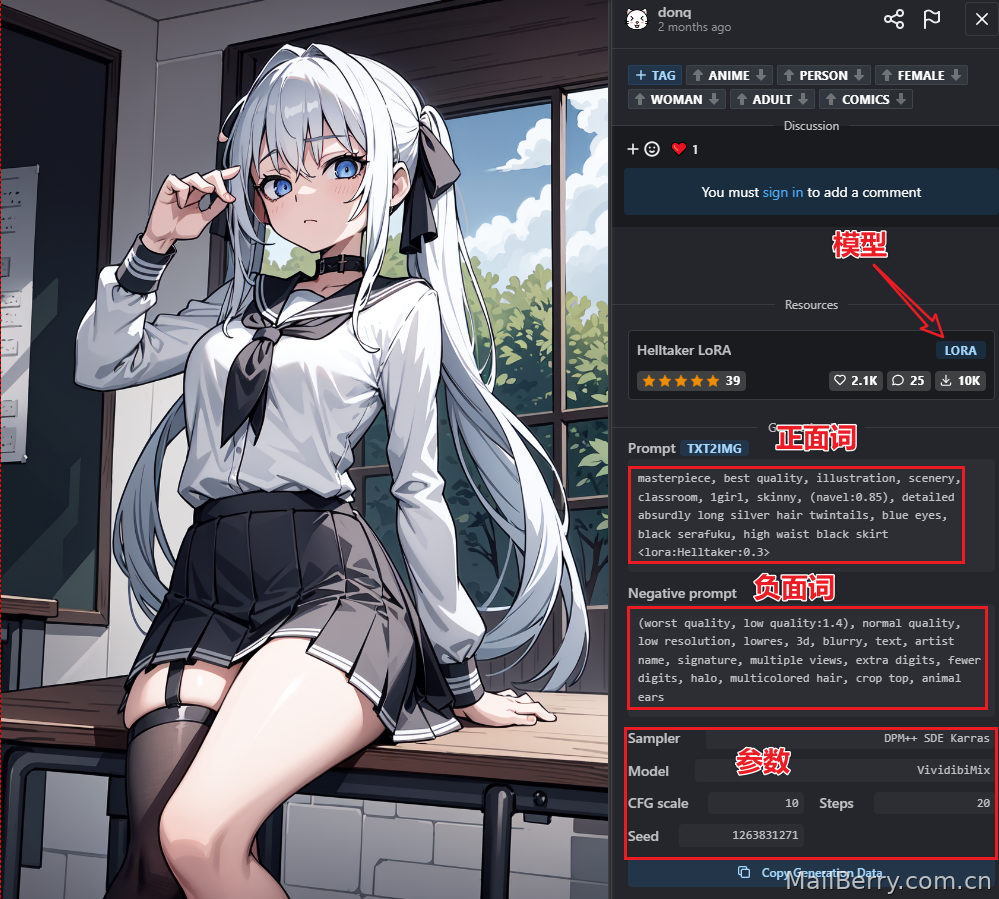
这个网站能下载模型,提示词,参数设置,是一个学习的好地方
总结
真的太令人惊喜了,有了ChatGPT,再加上stable diffusion,要文案有文案,要图片有图片,甚至自动生成视频也不是不可能的,2023年,一句话,只有你想不到,没有做不到,一个科技跳级之年。


暂无评论